Q&A Calorie Counts on Menus: Are they Accurate, Understood, Effective, Worthwhile?
Landscape photography is often regarded as the ultimate test for any photographer and many vacation photos are often very disappointin.
What goes wrong? How can you improve your techniques to get the best photographs on your next vacation?
One of the major issues is that with landscape photos you have so little control of the subject and the lighting and so timing, framing, position where you take the photo and planning are critical.
However, you need to understand the critical elements of photographing landscapes to effectively answers to the questions: When, Where and How.
This review includes the best of the best advice on landscape photography.
Basic Lanscape Photography - 10 Tips
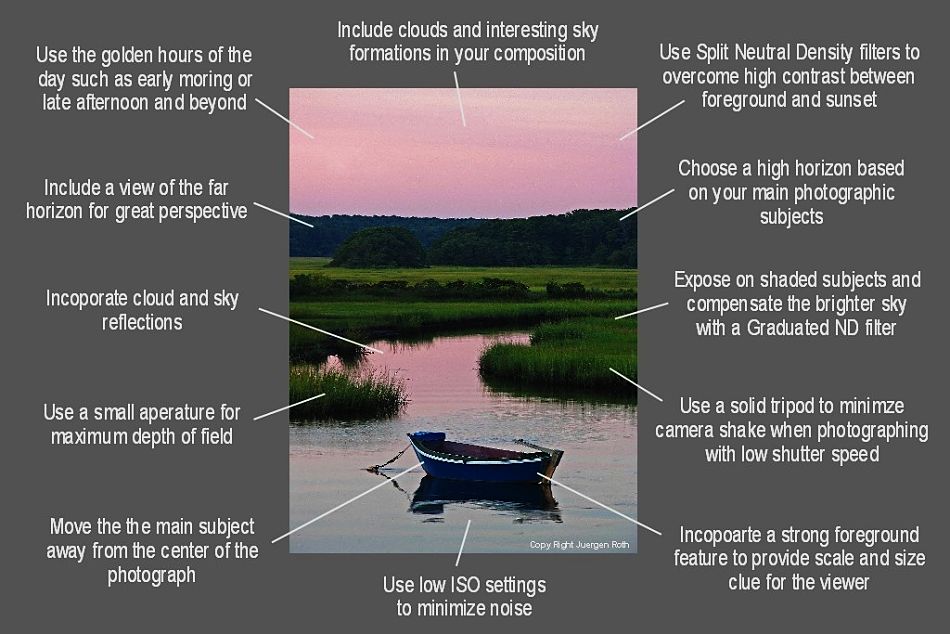
Tip 1.Summary of Easy Tips for Lanscape Photography Source: https://kbsmile.com/tag/landscape-photography-tips/
Easy Tip 2 Put someting in the foreground
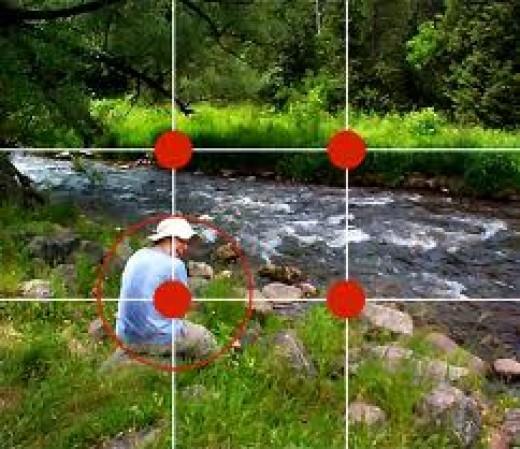
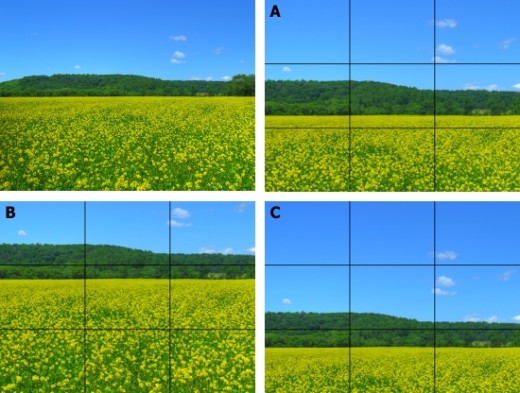
Easy Tip 3 Focus points - thirds
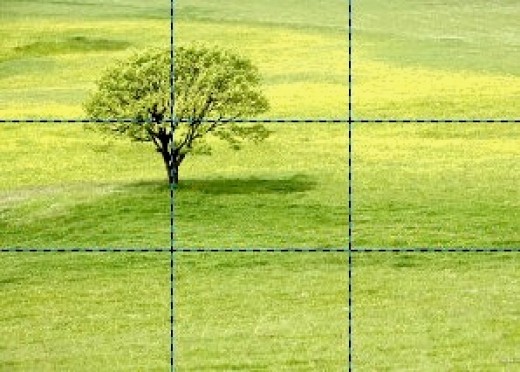
Easy Tip 4 Focus points - thirds
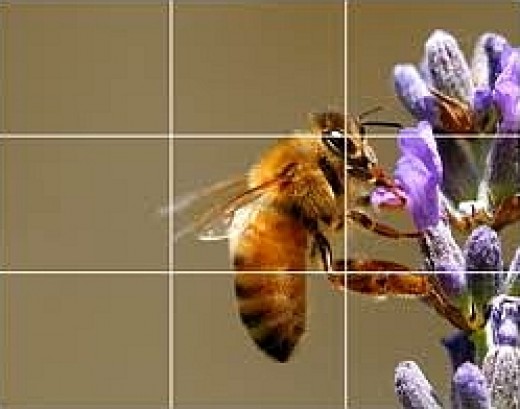
Easy Tip 5 Focus points - thirds
Easy Tip 6 Get the right amount of sky
Easy Tip 7 Dramatic Surrounding help to create action
Easy Tip 8 Get the balance right
Easy Tip 9 Foreground feature helps
Easy Tip 10 Depth of field
How to Compose your Landscape Photograph?
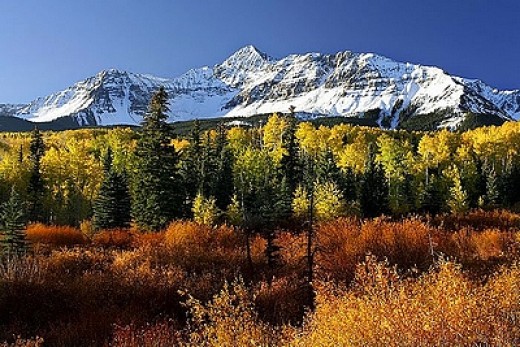
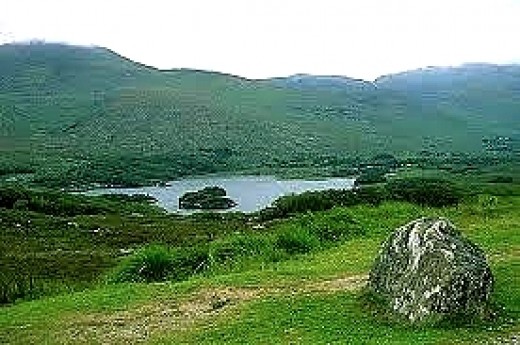
The best initial advice is to think 3-D for the composition and always ensure there is foreground, centre and background - find a key feature in the foreground that will provide a context and focal point for the viewer.
When many people think of landscape photographs, they generally conceive of a distant of distant mountains or islands off the coast, but they fail to provide a 'key' or focal point in the foreground that leads the eye of the viewer to the mountains and provides critical context and scale. That is why the 3-D concept is so important. You need lots of depth of field for the composition, and provide elements about one third the way from one side of the image that will lead you the background and provide depth. It has been called a 'visual handrail' as it helps the viewer enter the scene.
You need to think very carefully about where you need to take the photograph from in order to build-up such a 3-D scene that has a foreground, centre and background. This may take time, exploration and planning. Think of blending a tree, a branch, rock or foliage in the foreground, including a lake or other feature in the mid-distance lake, and finally the distant cloud-shrouded or sunset highlighted mountains that give the photo its depth and full composition. Every landscape photo should have a good quality and interesting foreground, middle ground element and distant background to give it three dimensions.
Find for a Focal Point
All landscape photos need a key focal point. Landscape shots without a focal point look empty and bare and your viewer's eye will wonder around being lost for a point to start taking in the image.
Focal elements can take a host of many forms such as a building, a fence post, a structure, a tree or branch, a striking boulder, rock formation, or a road winding towards the may part of the scene.
You need to think carefully about what you can uses as a focal point, but also where you place it in the frame of the image. The rule of thirds is a good starting point for this, but there are other techniques by avoid placing it dead centre. Avoid having prominent vertical and horizontal lines in the centre of the image.
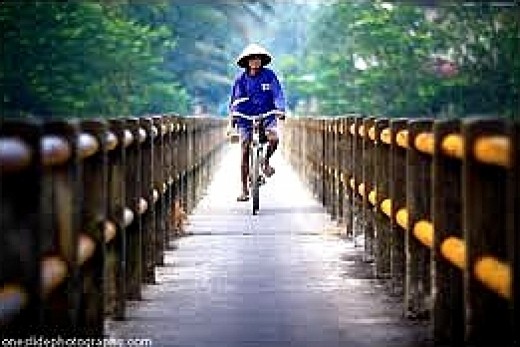
The critical question for composition is how am I guiding the eye of those that view this shot. There various ways in which this can be done including the foreground itself. The key is to provide viewers with lines or directions that provide a path into an image the way you want them to go. Lines provide context, depth, scale and can be features of interest by themselves such as a road. horizon or coastline.
Get a Good Foreground
One ingredient for an excellent landscape shot is to think carefully about what foreground you want in your shot and to spend time and energy getting to that spot! This crucial element with give your shot a sense of depth , a context and help the user to appreciate the scene.Dealing with the Sky
The sky can be very problematic for a landscape. If you have a plain one-dimensional sky, or a rather boring sky without storm clouds or other features – don’t let the sky ruin your shot. Position the horizon high up, in the upper third section of your shot for a boring sky. However if the sky is has dramatic features such as interesting cloud formations, colors from a sunset or sunrise, or dark storm clouds, let the sky fill the upper two-thirds of the picture.Consider enhancing the sky in the image by either the using filters when taking the shot or doing various modifications in the post production. For example various polarizing filters can add contrast or colour depth to the image.
Should a Wide Angle Lens be Used?
The answer is Yes, most of the time. Wide-angle lenses not only increase what can be included in the scene, they also help to keep more of the foreground and background in focus at the same time. There is nothing worse than a photo where the foreground feature such as a tree or branch is in focus but the rest of the scene is blurry. Similarly you want to avoid the foreground feature being blurred.A wide angle lens can greatly increase the sense of depth for the composition and can help you include a foreground that would be missed if you used a normal lens. Finding a foreground element at the beach can be difficult. There are various things you can do such as using large or small rocks to create a key anchor point for your photo, sea shells are a very useful focal point, and seaweed and animals such as a crab or starfish can be very useful. When all else fails you can focus on the small waves or ripples on the shoreline. Wave patterns or tiny breaking waves can provide interest, particularly if there are reflections.
Should you Use a Tripod and Slow Shutter Speeds?
It is all about depth of field. The critical aspect about landscapes is simultaneously getting a both the foreground and background sharply focused. This will generally requires shutter speeds that are slow and this will mean a tripod is generally preferred. Stability is critical for sharp focus even if you rest your arms on something nearby. Some people even the mirror lock to prevent tiny vibrations. On the beach or in loose sand or gravel you may need to push the legs of the tripod into the sand and time the shot to when the waves have fully receded or the waves are coming in. It takes practice to get the timing right and you will probably get wet.Experiment with Different Shutter Speeds and don't be focused on only one shutter speed. Very long exposures can create a dreamy or foamy look. On the other hand, short shutter speeds tend to freeze the movement of the water, the wave action and even droplets in the splashes. The most useful shutter speeds are probably somewhere in the middle. Try shutter speeds between 1/50 of a second and 2 to 4 seconds to get what you want. Many speeds such as 1/4, 1/8, 1/15 and 1/30 are often ignored but can produce very beautiful photographs.
How to get Extra Depth of Field?
There are exceptions when being creative but the general approach is to make sure that most of the scene is in focus when you take the shot, remembering that the background will be a little sharper than it appears in the view finder. The best way to increase the depth of field is to select a medium to small setting for the aperture ( i.e. a larger number). The smaller the aperture you use, the bigger the depth of field in the photograph. This will require other adjustments to compensate for the lower amount of light either by lengthening your shutter speed or increasing your ISO or (or both). ISO sensitivity for a tradition film refers to the speed of photo film negative (previously known as ASA). For digital cameras that do not use film the equivalent ISO value is usually given. It is worth taking two or more shots if you need extra depth of field. Some cameras allow you to combine the images or you can do it in the processing. Even with a super small aperture you may have depth of field problems, so again take two images - one that’s focused on the background and one that’s focused on the foreground. Then, later combine these two images in the processing.What is the Best Time to Take the Photograph and the Preferred Weather Conditions?
Weather and time of day can be absolutely critical as well as tide, wind, temperature, fog, mists and other aspects. You have to simply be patient and wait until that perfect moment. When using lower shutter speeds on windy days, the moving flowers in the foreground and moving trees away in the distance will cause blurs. Don't shoot in hope, but be patient and take many shots to get it right.Should the Water be allowed to Swirl and Whirl in a Blur?
Generally let the water whirl as it creates a good effect that looks natural. Streams and waterfalls often look silky at slow speeds, whereas higher speeds make the water look frozen and jagged.Getting the Lighting Right?
Don’t let your images look all gloomy and dark. Remember that despite what many people think you are photographing the light on the subject rather than the subject itself. You can not lighten the distant hills or ocean with a flash. So if the light is low and you can not adjust for it, you are probably better choosing a smaller scene, which has more even light. Overcast conditions can be wonderful for black and white but not for color.Don’t depend on auto white balance but if you take the photos in RAW though, you can generally adjust the white balance during processing, without losing any quality.
Increase the noise reduction setting for long exposures (anything more than a second) for scenes shot in very low light.
Use Filters to Avoid to much Contrast?
Too much light can be as bad as too little. Although its best to take most landscape photos in the “golden hour” at dusk and dawn, you can still take great images in full sunlight using filters, particularly polarizing filters. Filters can help remove reflections from water and adding rich textures to rocks, clouds, tree trunks and plants. Some effective filtering can be done during the processing. Use a polarizing filter to help to darken the sky darker and to enrich the various colors in the scene. In addition you can use a neutral density or graduated grey filters to make the sky darker and reduce glare, and reduce the contrast between the sky and the landscape. Frequently, the sky can appear burned out in photos either because the digital sensors or films lack the range to cover the difference in brightness between the sky and the dark foreground scenery.You can also use color correction filters to alter the color of light on a landscape, either 'cooling it down' or 'warming it up' according to which the filter is used.
Take Time to Choose your Vantage Point
=> Use high vantage points to provide a panoramic outlook of the scene, and if you have a camera that provides a large range of controls such as a SLR camera start with and aperture of f/16 or f/11 to maximize the depth of field and get everything in focus.=> Early in the morning and late in the evening are the best times for taking landscape photographs. This is because the lower light intensity and lower sun angle makes shadows and discloses textures and detail not seen in the middle of the day.
=> The best landscape scene are rarely discovered along the edge of the road or from a scenic lookout. You must be prepared to scout out the best location by exploring the area to find the most intriguing locations and spectacular focal point for the foreground.
=> A wide-angle zoom lens provides more scope for framing the scene and eliminating unwanted features. The key point is to always find a stunning features for the foreground to provide depth and context for the photograph. Try to use a small aperture to keep the whole scene in view.
What Format Should You Use?
If you use a digital camera, with the capability to shoot RAW images, use this format rather than JPGs. The RAW format takes up much more or your memory card. You cannot do in-camera processing on the image with RAW, as you can for JPGs, but it will be better in the long run. RAW images provide much better options and scope for image processing using Paint Shop Pro, Adobe PhotoShop or another image editing software package.Hints for Various Landscape Subjects
Flowing Water - think about how to convey that character in the image by setting the mood using water. A big, slow river looks and feels different from a fast-moving mountain stream. The water can be the center of interest in the image, or it can serve as an element in your composition—as a diagonal or other leading line, as a horizontal line, or as a shape that complements other elements in the frame. Where possible walk around and time your visit so you can make use of reflections in the water. Use a polarizing filter to eliminate some of the reflection and increase contrast; rotate it until you have the effect you want.
Forests - Start by deciding want mood to set. Do you desire the plantation to seem dark and brooding, or to have an airy and light feel? Find an interesting focal, such as a road winding through the plantation, a tree trunk, a shaft of light, or a blink of color on a flower, tree trunk or leaf. Compose your photograph to lead the viewer to the scene you desire to depict and to portray the feeling that you want. Whether you are taking the photograph looking toward a forest or inside it, look for lines, patterns and other features you can use in the composition. Try both telephoto and wide angle lenses. A a wide lens looking from the ground up to the trees will make them seem to soar. A telephoto lens will compress a row of trees and bring them together. Try many vantage points to get the right composition - climb a tree to view down a winding path or a stream or lie down on your back and take the photo viewing straight up through the branches.
Plains and Open Fields - Wide-open spaces such as plains, fields and prairies are very difficult and tricky because it is hard to find a theme and interesting focal point. Usually the vast expanse of the scene is the dominating aspect, but the viewer needs something to showcase this. Spend time trying to find an object for focal point such as an old plough or cart. Remember the rule of thirds and the scene is likely to be dominated by sky and the plain and so you need to compose the scene carefully otherwise it will be boring. If the sky is not important, put it in the upper third. If it is important compose the shot so that the horizon runs along the bottom third of the frame for the scene.
Deserts - Find the best way to illustrate the rugged beauty, natural seclusion and eery silence and beauty of deserts. In the middle of the day, the heat causes waves in the sir you can see. Use a long lens to bring them up close and you will dramatic shots that showcase the extreme heat. Deserts are wonderful places for pictures of the night sky and stars. Timing is critical in deserts and you can literally see the colors change after sunset, though the day and into the evening as the angle and brightness of the sun changes. Wide-angle lenses usually work best in deserts because the bright sun takes up less of the frame and you can adjust the light better.
Coastlines and Ocean Scenes - What time of day, what tide, what kind of weather and what season are all important at the coast. There is so much to see at the coast and things are constantly changing. Decide what you want to portray. Look for features you can employ to convey the mood and story you are after. As in the desert or snow bright sand can be very hard to photograph. To get beautiful light, spectacular colours, and reflections on the water, take your photos at dawn and dusk. Start preparing at least 60 minutes before the sunrise and continue after sunset. Some of the best moments occur when the clouds are highlighted the sun which is still below the horizon. Timing is important for photographing waves as waves patterns occur that you need to be aware of and use. Tides are also critical.
Mountains - What feeling do you get from looking at the mountains? Look for features that will enhance your feeling and mood and impress it on to the viewer. Angle, light, time of day, season and weather are all important? The foreground and sky are critical parts that can make the photo come alive or become boring and lifeless.
Conclusion
=> Follow the Guidelines, but try to experiment and be original! Develop your own way of seeing things and translate this into your own style.=> Great photographers produce wonderful unique images that reflect their character and view. But avoid radical and weird photography.
=> Try non-standard viewpoints and other composition ideas, but try to be fairly conventional at the start.
=> To find inspiration just look at all the wonderful photos on Flickr and other online collections.
=> Tell a story with your photographs. Think before you take each shot about what you are trying to say to the viewer about the scene. What moves you or attracts your eye about that scene and the light displayed in the scene? Take time to think about the story and you will take better landscape and vacation photographs.